I'M HERE TO INSPIRE AND BE INSPIRED!

Sunday, January 26, 2014

Zoey's bed for RB/MQG Challenge


I finally finished my entry for The Basics Challenge with Riley Blake Designs for the 3rd annual MQG members fabric challenge.

I decided to make my little doggie, Zoey her own little bed so she can hang out with me in the sewing room.

I only used the yellow polka dots of the fat eighth quarters that were sent to me. I initially had an entirely different design in mind at the beginning of this challenge. I ended up taking a whole different approach. I think I was really inspired by Elizabeth Hartman's Dancing Queen quilt. The Dancing Queen quilt is the last quilt I made as a Christmas quilt for my Dad. I just expanded it a bit to make a brick wall.

I used exclusively Riley Blake polka dots for my print selections, and grey for the mortar. For the quilting I really wanted some graffiti. I have always loved graffiti art. I don't condone vandalism, but graffiti has it's own beauty.

I started out using some grey thread. Then I thought this was way to safe. Not very exciting. So ripping commenced. 

YES! Much better. Way more exciting!!!

The rest of the background I did an all over circuit board design. 
To gauge this micro-quilting, the mortar finished pieces are 1/2 an inch. That's some tiny quilting. My hands cramped up more than once:/

I guess I should show my little mishap.

This is the other side that I had a mishap marking my quilt! This is permanent marker! I managed to get most of it out but for some reason, what was on the red would not budge. Here is my solution....


I stuck my quilt label over the top of the mistake like a bumper sticker:)  I'm really liking the offset of the label! And Zoey prefers to get comfy on this side of the dog bed more than the pretty side which is a little stiff due to all the dense micro-quilting.
Yaaaaaa, I think she likes it.

Project completed! Now..........what to do next?!?!?


Wednesday, December 25, 2013

Last quilt of 2013

This will surely be the last quilt finish of 2013. I made it for my dad for Christmas.


I wish I would have gotten a picture of when he unfolded it, but sometimes we get caught up in the moment. I'm pretty sure he liked it.


This is  my version ofElizabeth Hartman's Dancing Queen quilt.I added a row on the length and width making the finished size 74in.X78in. I think it's the biggest quilt I have yet to make. To me, it was a monster to make.  Each block took me 2 hrs. I made 22 blocks.  The quilting didn't go quite as bad as I expected. I finished that in about 12 hours. Add in all the cutting, and piecing the blocks, squaring, etc....well, I lost count of the hours, but you all know where I'm coming from:)
It's kind of hard to see but I did an all over circuit board quilting keeping it 1-2 inches apart. I wanted a snuggly quilt.  Dense quilting is so pretty, but not really snuggly in my opinion.

I loved how it turned out! It's a great quilt to finish the year out with!
I hope all of you had a GREAT CHRISTMAS!! I know I did;)


Friday, December 13, 2013

Sew Sweetness & Sew Mama Sew Bag Contest

Here I am, under the wire to get this Aragon Bag done for the Sew Sweetness & Sew Mama Sew Bag Contest. I just finished a night time photo shoot, so my photos were the best I could do under the circumstances.


Here's the front. I found this "Ray" fabric by French Bull a few months back at my LQS. It was one of those buys like, I don't know what I'm going to make with this, I just have to have it!

My mother-in-law has been hounding me to make her a diaper bag for a few months now.  She watches my twin nieces all the time and wanted her own diaper bag. She somehow has it in her head that it is cheaper to make one than buy one. Well, it is when the maker BUYS ALL THE SUPPLIES, LOLOL! ( It's gonna be a Christmas present so it's totally worth it;)When I saw this contest, I knew the fabric would look GREAT with the Aragon  Bag and enter the contest thereby killing 3 birds with one stone!

Here is the back of the bag.

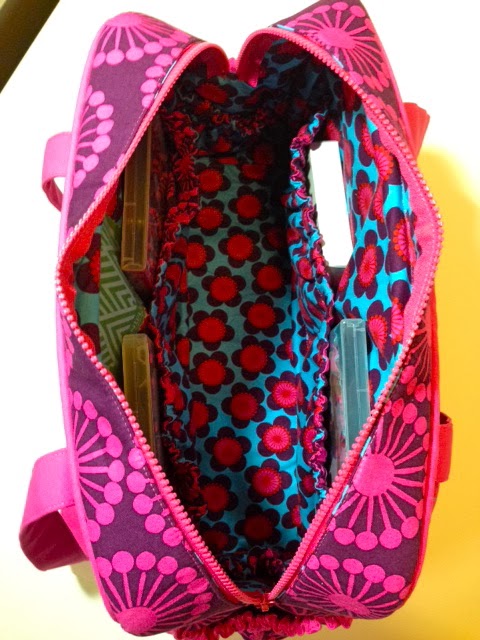
Here is the inside. I totally LOVE all of the pockets!

I stayed pretty true to the pattern other that adding a few of my own touches.

I added piping and accent fabric at the top of the outer side pockets. I think it makes the bag look so electric!

I have to say I LOVE this bag and I know my MIL will too! It took me many many hours to complete, but so worth it! I read one of the testers completed one in 7 hours! Ummmm.........not gonna happen here;) I guess I'm a slow sewer!

I really love Sara's bag patterns and the next one I do will be from her book Big City Bags, the Fireside Bowl Bag! LOVE IT!

Wednesday, December 4, 2013

Some loot and a baby quilt

 I've been a little blog lazy lately, but not because I'm not getting things done! With Christmas quickly approaching, I have a more than a few projects in the works. As usual, I'm probably biting off more than I can chew.

 I made this little quilt for a work friend who is expecting her first baby a few weeks back. I needed to get it done fast. I saw this quilt on pintrest and thought it would be a cute quick quilt.


I changed the arrangement for the back.


I did some super quick loop-de-loop quilting.

She LOVED it! It turned out so light and cuddly!!!!


Here is some loot that came in the mail today! It's my winnings for the Purse Palooza 2013!!!!YAY! I have to give a BIG THANK YOU to Sara Lawson, Kay Whitt and Pat Bravo!!


I'm keeping it short and sweet today. I have a monster quilt i FINALLY got pieced and basted that is screaming to get done!


Danielle

Wednesday, October 30, 2013

Bulldog Bag #2

 Here is the second prototype of my Bulldog bag. You can see my first version here. My friend/coworker, Kelly is modeling the bag for me. I asked her to model it for me because this girl has STYLE! I think my bag looks great on her and she makes my bag look great;)

 I quilted it this time. I used quilting weight cotton so I wanted to experiment to get a good weight to the bag. As I was quilting the pieces, I wasn't sure if I was going to like it. I almost scrapped it before I ever finished, but I'm glad I didn't! I love how it turned out!

I really LOVE this bag! I made it a tad bigger then the last one. A bigger bag is better for me! I also did a tutorial for the twisted handle, so if you want to give it a try, check it out HERE!

This is my second entry for Purse Palooza 2013 So go check out all of the great entries!

Twisted Cord Purse Handle Tutorial

 As Promised, here is my twisted cord handle tutorial:


You are going to need about 3 yards of 12/32 upholstery cording. You can get this at Joann's and Hobby Lobby. Also, you need to cut 2 a 45" pieces of fabric on the bias. I cut mine 2and 1/8 inches.
Cut your 3 yards of cording in half. Make sure to tape the raw ends. 
Fold your bias strip right sides together(don't iron it, just fold) and sew with a 1/2" seam.
Cut off most of your seam allowance. I used pinking shears.
put a safety pin on one of your ends to get ready to turn.

I know this picture is blurry, but you get the idea.
I bought this handy little tool at Joann's in the notions section to pull cording through.
Stick it down the middle of the top of your cording and pull the little ring down to secure.
Insert the cording into your fabric tube that you made.
 You are going to need to push and pull the fabric to get it all the way on the cording. It gets slippery with the cording tool. if you noticed, it has a small loop at the top. you can stick a pin through the loop(just feel for it)to help keep the fabric from slipping back.

Once you get both of your cording all the way made, slip them BOTH around the ring and fold in half. Secure with a rubber band.
Cut 2 of you ends evenly and wrap thread around so they will be easier to insert onto the other ends.The other two ends need to be cut evenly as well. Also, you will need to peel back the fabric a bit and cut a chunk of the inner cording out-about 2X's as much as you wrapped the other 2 ends. NOTE: you can save this step for later if you are worried about the length of your strap.

When you cut the cording out, it should look something like this.
 Begin to twist your strap. It will naturally want to twist. Try to keep the pieces going in the same flow all the way down.

Put another rubber band on the end. If you haven't trimmed and wrapped and clipped the cord ends yet, do it NOW.
Fold in your 2 pieces that you cut a chunk of cording out of. At this point, if you don't have O rings that open, you are going to have to put them on and sew the pieces around them. I suggest using spring open o rings. I bought mine here. That way, you won't have to deal with trying to stitch around them and can it them on later.
Put your cord wrapped ends into the folded in ends. I already got my needle started in one end at this point. Then just stitch it shut.
At this point, you should have something like this. you can take the rings off for the next step as well.
I used jewelry wire 20 gauge.I like that they have colors! :)
bend your wire down so you can cover it as you wrap.

keep wrapping leaving just enough room for your ring. once all the way down, cut off your rubber band.
Now feed the other end of the wire behind the wrapped wire. If it's tight and hard to feed through, you can use a big blunt upholstery needle. That's what i ended up doing on one end that was very tight! (I wish I would have gotten a picture.)Cut down your wire ends and hide as good as you can!
You're DONE!

If you have any questions, just ask. 


Danielle